Monday, October 19, 2015

Halloween Spell Book Tutorial

A couple of weeks ago, as part of a Disney craft swap group, I made some Halloween Spell Books.  Several people asked me either to A) Make them one they could buy or B) Tell them how to make them.  I still needed to make myself a Spell Book and I don't like selling my crafts because my perfectionism drives me crazy if I do, so I decided to make a tutorial.


Materials:
- Book you aren't intending to read again
- Plastic Halloween decorations (spiders, skeletons, vampire teeth, etc)
- Hot glue gun
- paper towel
- modge podge
- black paint
- gold or copper paint
- black ribbon

I started with a book I bought from the Dollar Store.  I chose it because the cover was already black so I knew that I wouldn't have trouble covering it with black paint.

My husband applauded my choice of books because he has apparently read the Portrait of Dorian Gray and thought it was an appropriate Halloween book.  I'll take his word for it.  I love to read, but not thrillers.  I opened the book to the middle and sprayed the pages with a whole bunch of water.  this gave it a curled, older look.

Now you can create the two inner pages yourself or you can find some on the internet.  Thank you to http://griffithsrated.blogspot.com for creating these pages that I used.  You can download them here:  http://www.mediafire.com/folder/vdsbazb64zz7d45,tqm8s3qpdx41376/shared  I only had a black and white laser printer so I needed to make my pages look a little older.  I brewed some tea (because I'm slightly addicted to Sweet Tea) and then pressed the used tea bags all over the pages and let them dry.

Next it was time to work on the outside of the book.  I took some of the plastic Halloween decorations and glued them on.  You can also use raised letters, thumbtacks, etc. to decorate your book.

After gluing take a piece of paper towel and separate the two layers.

Modge podge the entire cover of the book, including over the Halloween decorations.  Don't worry if the paper towel gets wrinkled or overlaps on each other.  At this point it doesn't look very pretty.  But it will get better.

When the modge podge is completely dry, paint over it with black paint.  When the black paint is dry, lightly brush over  all of the decorations and bumps with gold or copper paint to give it more of an aged look.

When the cover is completely dry it's time to turn it over.  Take your dried pages and modge podge them into the book.

After the modge lodge is dry just cut a piece of black ribbon and hot glue it to the middle of your book from your bookmark.

I hope you guys enjoyed this tutorial!  If you have any questions, please let me know!

Monday, July 6, 2015

Superman Taggie Blanket

A good friend of mine, Keri, is expecting in August!

I'm planning to give Keri quite a few practical things.  But I also wanted to give her some personalized gifts for the baby.  They have not yet revealed his name.  However, after throwing her a really cute Gender Reveal Party in March (maybe one day I'll remember to post it!), we discovered that she LOVES Superman.  Yes, it's a boy.

I recently received the Baby Shower invitation, unfortunately I'm going to have to miss the shower because it's during our trip to Maine.  Anyway.  Around the same time I received the invitation I found some super cute, not too expensive fabric at Wal-mart.  It was meant to be.

The first thing I decided to make with this fabric is a Taggie Blanket.  This is a really easy project, great for beginners.

The first thing you are going to do is cut 2 shapes (they need to be mirror images of each other) out of fabric.  You don't need a whole lot of fabric and your really can choose any dimensions you want.  A lot of people do square taggie blankets, they are probably the easiest.  Because of the theme I chose to cut out a Superman symbol.

Now its time to cut out your ribbon.  I had a variety of ribbon just laying around so I chose 5 of them that coordinated with my fabric. It's great to have a variety of sizes and texture.  I then cut them into 3 inch strips.


I folded the ribbons in half and sandwich the ribbons between the two pieces of fabric (the fabric is going to be right sides touching each other).  The rough edges of the ribbon matched up with the rough edge of the fabric.  Place a pin on each piece of ribbon to hold it in place.  You can measure to make sure the ribbons are the same distance apart but you don't have to (I didn't).


Sew around the fabric, carefully removing the pins while keeping the ribbon in place.  Leave space open between two ribbons so that you can turn the fabric right side out.  After sewing go ahead and turn the fabric right side out.


Now it's time to close that small opening.


Simply fold the unfinished edges in.  Then stitch around the edge of the ENTIRE blanket (this is called top stitching.  It will close the opening, make the blanket look nicer and help make sure the ribbons don't come out.)

And Wallah!  Your taggie blanket!!!


Stay tuned for a couple of more projects with the left over material!

Friday, June 26, 2015

The 20-minute (sort of) Kid's Skirt Tutorial

Disclaimer #1.
The skirt should only take about 20 minutes.  I made 3 and it took me 2 days.  This is due to spending time with the kids, having to cook dinner/lunch, kids interrupting me when I was actually sewing/ironing, a migraine and not being able to sew when the kids were in bed because my husband was also in bed (My sewing machine is in the bedroom.  He's had a long week at work.)  During the school year, when the kids are at school, I can usually do this in 20 minutes.

Disclaimer #2.
The person who taught me to sew is one of my best friends.  She is awesome.  She also teaches improv for a living (she does workshops and conferences - check her out.  http://www.improveffect.com)  Her sewing can also be described as improv.  There isn't a lot of measurement when making these skirts.  So, the technique I'm giving you works for us but you can always improvise on my tutorial to make it work for you.


I went shopping the other day and came across there fabrics I knew that my daughter would love them: Olaf in Summer, Minions and Inside Out.  Time to make some skirts!

My daughter is 7 (she'll be 8 in just 4 months) but she's very petite.  She just barely wears a 5T in jeans (I have to adjust the elastic in them to make them the skinniest 5T possible).  She's between short and average height.  Since her waist is so small most of the skirts and shorts at the store are what I consider too short for her.  So for me, this skirt is perfect.  She gets the designs she wants and I don't have to worry if it's too short.

All you need is 1/2 yard of fabric, 3/4 inch elastic and a safety pin.  A half yard is the perfect size for my daughter.  It falls around her knees.  If your daughter is smaller you may choose to shorten it a bit.

Step 1
Wash your fabric.  I do this for 2 reasons.  One, every thing I read about fabrics say you should wash them first because of shrinkage.  I'm not sure that would be an issue with this skirt but I still do it.  Two, the moment I finish the skirt my daughter wants to wear it.  It's already washed so I feel okay about letting her.  Go ahead and cut off the part of the fabric on the selvage that doesn't look the rest of the fabric (It's the part that that reads that the fabric is copyrighted and for home use only, etc, etc.)


Step 2
Break out the iron.  I'll admit right now, I hate to iron.  But it's kind of a necessity.  The first thing I do is iron my half a yard of fabric to get all the wrinkles from the dryer out.  Then at the bottom of the fabric I iron a hem.

Here's where my improv skills come in.  I don't actually measure the hem.  There are tools to do that and I know that some of you want it to be exact.  That's cool.  If I were making these to sell I would probably want to but my daughter is okay if it's not perfect and I'm okay if it's not perfect, so I eyeball it.  Anyway, I fold the bottom of the material about 1/4 to 1/2 inch, and then fold it over again and iron.  The reason I do it twice is to try to prevent the fabric from fraying when it gets washed.  If it makes you feel better you can then pin it.  I find that for me, with a really hot iron, I don't need to pin it.  For those of you who are new to sewing, the hem on this skirt goes from selvage to selvage.  A selvage is the finished edge of the fabric.  It runs the entire length of the bolt.

Step 3
Now it's time to add the waistband to the skirt.  Iron a 1/4 to 1/2 inch hem at the top (you don't have to do the double one like you did at the bottom of the skirt).  Now fold it 1 and 1/2 to 2 inches down and iron.  Essentially it's folded twice again to prevent fraying in future washes.  It should look like this:
(First Fold in Waistband)

(Second Fold in Waistband)
Step 4
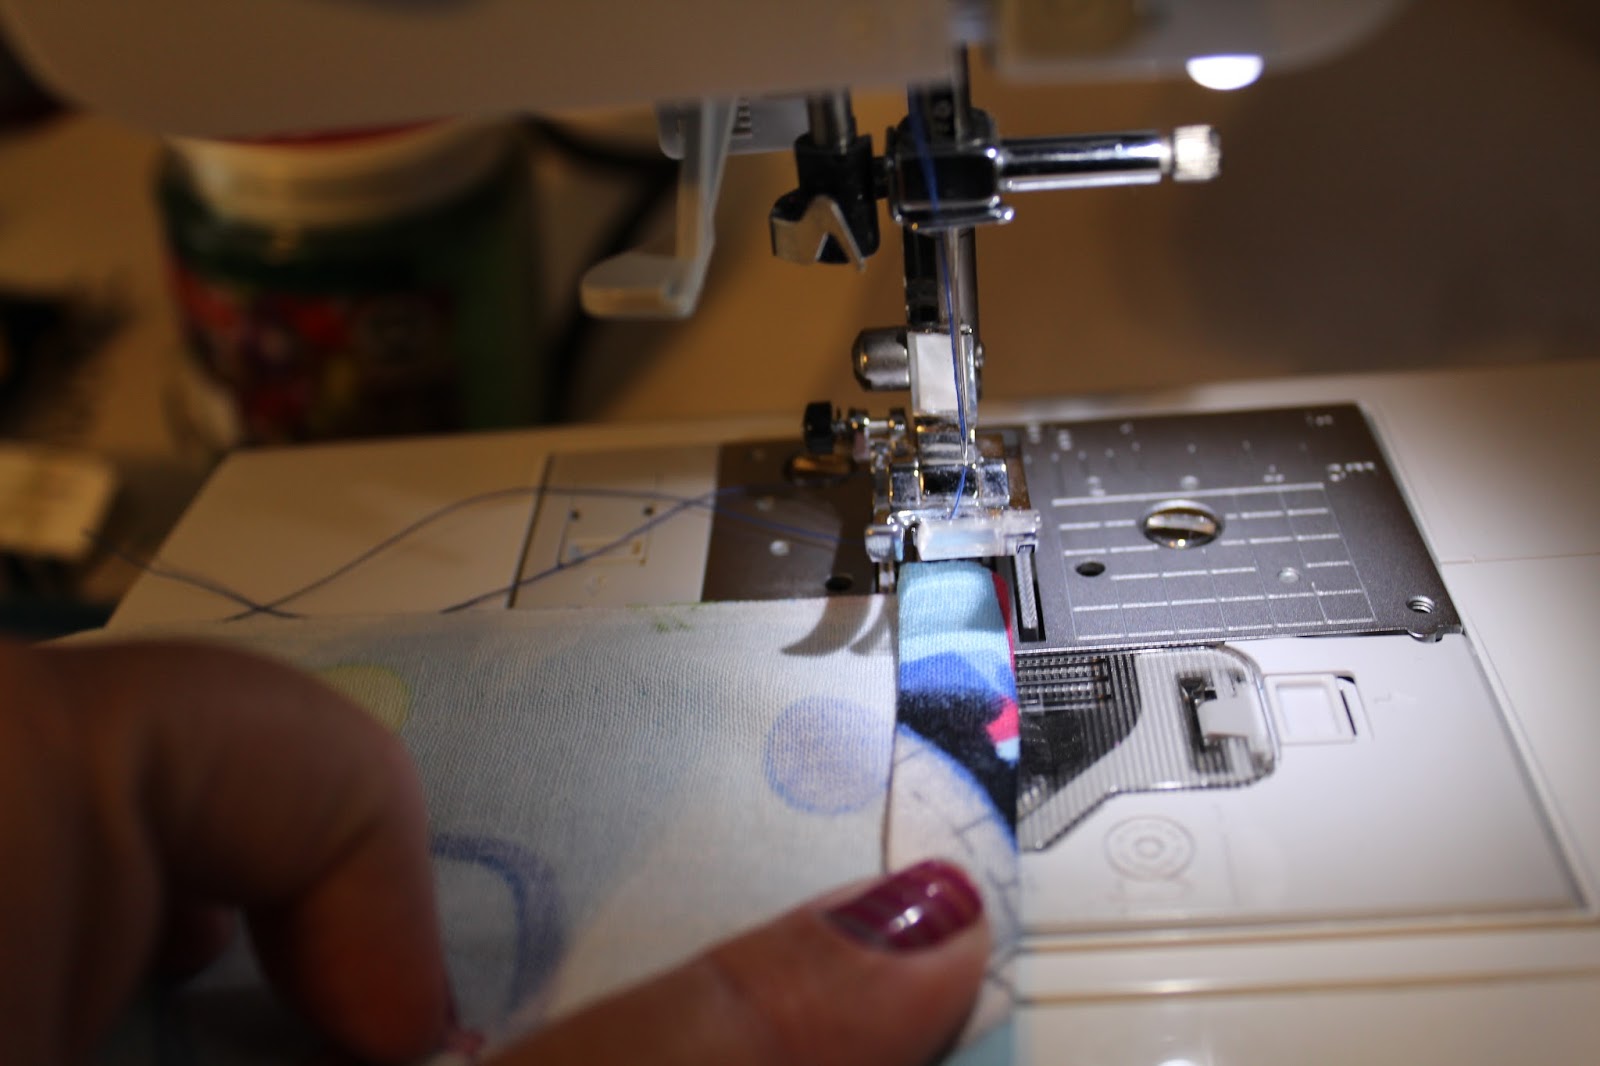
Time to sew!  I use a zigzag stitch to further prevent fraying.  I'm not sure if this is necessary, but it's what I do.  First, sew the hem at the bottom of the skirt.

Then sew the waistband at the top.  After you are done the back of your fabric should look like this (bottom of skirt is on the left, top of skirt is on the right):

The front of your fabric should look like this:

Step 5
Adding elastic to your waistband.  The first thing you want to do is measure how much elastic you'll need.  You can either take a soft tape measure and measure your daughter's waist or you can take the elastic, loosely hold it around her waist and then cut it where it meets.  Do not add extra to the measurement, it will stretch. Now put the safety pin through one end of the elastic, like this:

Then start feeding the elastic through the waistband.


Use the safety pin to temporary pin the two ends of the elastic together.
Step 6
Now turn the skirt inside out.  The right side of the fabric should be touching each other.  Pin the side of the skirt.
When you get to the waist band of the skirt, take the safety pin out of the elastic.  Overlap the elastic and tuck it into the waistband.  

Use another pin to hold it.  Now just sew up the side.

Step 7
You're done!
 If I'm unclear on any parts or if you just have a question, feel free to ask!!!!

I'm thinking of doing a tutorial next on how to make Minnie Ears.  Let me know if you're interested!

Monday, June 22, 2015

Having a #LaysSummer

Several weeks ago, right before summer officially started for us (A.K.A. the kids getting out of school), I had a bout of insomnia.  As with many in this technological age I turned my phone to browse the web, stalk friends on Facebook to see what they've been up to and like a whole bunch of Disney pictures on Instagram.  It was at this time that I found a link to have my "perfect summer day" picture on a bag of Lay's chips.  Although I had a limited amount of summer pictures on my phone I thought, what the heck.  So I submitted one and was told that in 24 hours it would let me know if I was approved.

48 hours later I received this email from Lay's potato chips:  Thanks again for submitting your photo with the Lay’s Summer Bag Creator. Your bag is included here featuring your favorite summer moment! Feel free to share on social using #LaysSummer and check back to see if it made our site gallery at Lays.com.

The email included a picture that I submitted placed on a digital Lay's bag.  Oh well. I was hoping for an actual bag of potato chips with our picture on it. But it's cool to be able to see a picture of the bag on the email and potentially on the website.  I'll check that later...

Fast Forward almost exactly a month later...  
UPS knocks on my door unexpectedly (usually I get a text from UPS MYCHOICE) and this is waiting for me.

Certainly it couldn't be...could it?  Oh my gosh, it is! My personalized bag of Lay's potato chips!!!

I had chosen a picture of 3 of my best friends and me (I was blessed with 5 best friends, most I've known for over 25 years).  It was taken in early March, hence the light jackets.  But there's the beach!

I am so happy with my bag of potato chips.  I hate to eat them because it's so cool!  And I'd really like my best friends Monica and Jaime to come to town to share them (my other best friend, Jessie already lives in town.  She needs to come too).  So girls...when are we eating our bag of chips?!?!  They expire in August so we must plan!

Want your own bag of personalized Lay's Potato Chips?  There's still a link available still, so you should try!  Here it is:  https://summer.lays.com/create-bag  If you receive a bag I'd love you to comment with a picture so I can see yours too!
  This post is not sponsored by Lays.  I requested a free bag of chips with the picture but was not compensated in any way for posting on this blog.

Thursday, May 28, 2015

TBT - a tour of Cinderella's Castle Suite

In 2013 Walt Disney World in Orlando ran a promotion called 'Limited Time Magic'.  Each week, for 52 weeks, they did something special for their guests.  Sometimes it was a chance to do a meet and greet with a rare character or receive a free poster.  One day in October the Disney Parks Blog announced that for their next week's Limited Time Magic they were going to let 125 people tour the castles of Magic Kingdom - including Cinderella's Castle Suite and Be Our Guest.

Here was my chance ~a dream come true for many Disney fanatics!  They were planning to choose the winners by running a sweepstakes from 1-5 pm that day.  I had had crazy good luck in winning sweepstakes lately (that's for another post) so I decided to go for it.  I was a little nervous about winning it because 
  1. I was pretty broke that week and would have to scrape together money for hotel and gas (we live exactly 2 and a half hours from my door to the Walt Disney World welcome sign) 
  2. You couldn't bring anyone along on the tour and I know my husband wasn't crazy about me staying at a cheap hotel by myself.  I also felt slightly guilty that if I was chosen I couldn't bring my daughter.

A few hours later I received this email:

I was going to get into Cinderella's Castle Suite!!!!!  Thankfully we worked it out that our good friends would keep the kids Monday night and my husband would be able to come down with me. 

At 7:30 a.m on Tuesday, October 15, 2013 we showed up at the Magic Kingdom so that I could take my Castle Suite Tour (yes, technically it was touring both castles.  But it wasn't too hard to see the Beast's Castle so I wasn't as excited about that).

My husband, James, was going to wait out on the benches for me while I took the tours since they would be over by 9. When I signed in we found out only 12 of the 25 selected for the day actually showed up.  WHAT?!?!  I'm guessing that some people signed up thinking they wouldn't get it anyway...then they couldn't figure out how to quickly get a flight down, get off of work, or have someone watch the kids.  This worked in my favor.  They asked my husband if he had a ticket to get into the parks.  Thankfully we had just bought Annual Passes to Walt Disney World a month earlier.  So they invited him to go on the tour with us!!!!!

We were split up into 2 groups.  The group I was in was going to Cinderella's Castle Suite first.  SQUEAL!!!!
To make this trip better, our tour guide was Cathy Carver, who had worked on the design of Cinderella's Castle Suite.  They actually only gave her 6 months for the whole project!

When she unlocked to door we saw...not the suite.  Instead it was an office like room where the concierge stays. (They can't have guests coming down from the Suite after hours so those who stay there are set up with a concierge to get them whatever they need).  That's not to say it wasn't gorgeous.  Disney is just incredible with its details.  Notice the clock.  It is always at 11:59.  It never strikes midnight because the magic never ends.


Finally it was time to get on the elevator and head up to the Suite.  I had no idea even the elevator would be awesome.  Have you ever seen an elevator floor look like this?!

The elevator opened up into the foyer.

The floor was...wow.

The ceiling...it was incredible too!


And then there were the other details:


Finally it was time to move into the actual Castle Suite.  As you can see from the above pictures I didn't have a great camera so I apologize for the quality.  I have a DSLR now...I just need to get back into the Suite!

Here is the bedroom:


The bedroom had 2 double beds in it.  Both of them had the letter "C" above them.  One for Cinderella and one for Charming.  There were also beautiful columns, accessories and a frame on the wall that could turn into a picture, a mirror or a TV.  The Suite had all the modern conveniences.  They were just hidden so that it felt like you were in Cinderella's era.
 

 Next we walked into my favorite room.


There were gorgeous stained glass windows.  You can actually see them when you're looking up at the castle.  During the day I could look out the windows to see what was going on below.  But they had figured out a way that at night you weren't able to see out of the windows.  They wanted to keep the Magic Kingdom magical.


The last room we were able to see was the bathroom.  I have never seen a more fabulous bathroom before.  When we renovated our bathroom a couple of months later I could only wish it looked like this.


 See that blue ceiling up there?  It's above the bathtub.  You were able to turn off all the lights in the bathroom and then there was a button you could push to have twinkle lights come on in the blue area.  I imagine it would be like bathing under the stars.  Unfortunately I wasn't able to try it out.

The tub was surrounded by three gorgeous murals.
 

There was not any natural light in the bathroom.  This stained glass window actually went between the shower and the sink area.


So there's even a story behind the toilet.  They didn't want porcelain...too modern.  They didn't want gold...too flashy for cinderella.  So they toilet is actually made out of stone!


 So that was my tour of Cinderella's Castle.  I hope you enjoyed!  I hoping to one day be able to take me kids there.  They know exactly where the door leading to it is, lol!