Unfortunately, to get the apron the troop as a whole had to sell a certain amount of cookies per girl - and our troop fell a little short. She was disappointed but she understood. It was when she received the Girl Scout cookie bandana that an idea began to form. We would make our own apron!!
I came up with a design so I wouldn't have to cut the bandana (in case she ever wanted to use it as a bandana. I doubt she will, but who knows). Now, before we get into this project, I have to remind you of something. I am no Martha Stewart. The way I do things may not be the correct way, but they work for me.
The bandana that was given to me was approximately 20" x 20". And a beautiful fabric.
To begin with I turned the fabric inside out and sewed two of the sides together. The seam became the back of the apron. At this point you can also sew the bottom of the apron together.
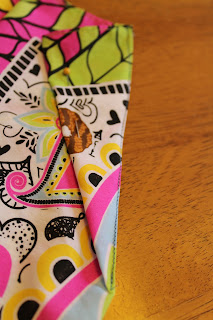
Next measure on your girl where her arms are. You want to fold two triangles into the top (back side) of the apron and pin them. Like this:
Now on the triangle's opposite side sew from the top corner down the long side only HALF WAY. (Sorry, the green part in the picture is the ribbon you'll be adding in a moment). Repeat on the other side.
Then you're going to take ribbon (I found a color similar to Girl Scout green at the Dollar Store) and thread it through both sides of the apron, making a loop at the top.
And you're DONE! Here is the final result on my Girl Scout:
Questions? Just ask!


No comments:
Post a Comment